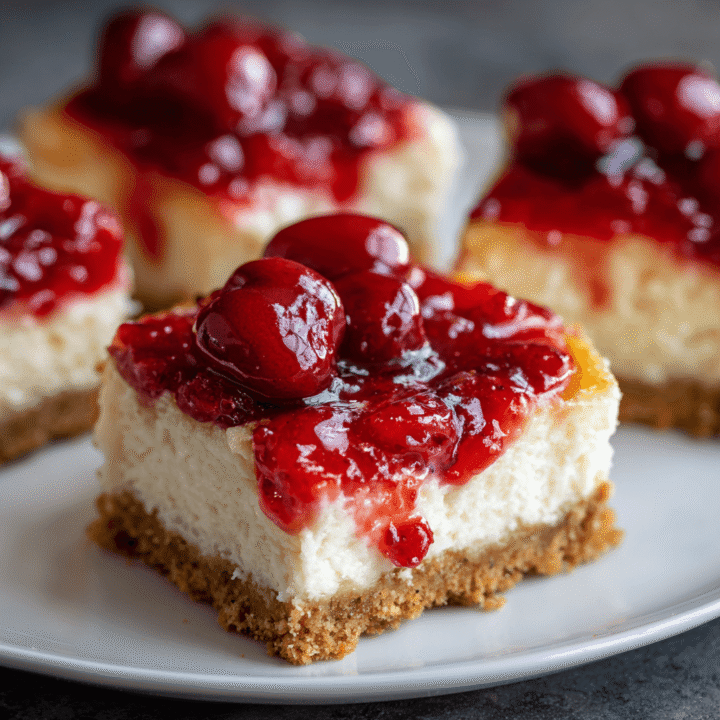
Cherry Cheesecake Bars are a delightful dessert that combines a creamy cheesecake filling with a sweet cherry topping, all on a buttery graham cracker crust. These bars are easy to make and perfect for parties, picnics, or any occasion where you want to impress your guests with a delicious treat!
Ingredients List
For the Crust:
- 1 1/2 cups graham cracker crumbs
- 1/4 cup granulated sugar
- 1/2 cup unsalted butter, melted
For the Cheesecake Filling:
- 16 oz (450 g) cream cheese, softened
- 1/2 cup granulated sugar
- 1 teaspoon vanilla extract
- 2 large eggs
- 1/4 cup sour cream
For the Cherry Topping:
- 1 can (21 oz) cherry pie filling (or fresh cherries, pitted and halved)
- Optional: Fresh cherries for garnish
Timing
Preparing Cherry Cheesecake Bars takes about 20 minutes of prep time and 30-35 minutes of baking time, plus cooling time.
Step-by-Step Instructions
Step 1: Preheat the Oven
- Preheat Oven: Preheat your oven to 325°F (160°C).
- Prepare Baking Dish: Grease a 9×13-inch baking dish or line it with parchment paper for easy removal.
Step 2: Make the Crust
- Combine Ingredients: In a medium bowl, mix the graham cracker crumbs, granulated sugar, and melted butter until well combined.
- Press into Dish: Press the mixture firmly into the bottom of the prepared baking dish to form an even layer.
- Bake: Bake the crust in the preheated oven for about 10 minutes, or until lightly golden. Remove from the oven and let it cool slightly.
Step 3: Prepare the Cheesecake Filling
- Beat Cream Cheese: In a large mixing bowl, beat the softened cream cheese with an electric mixer until smooth and creamy.
- Add Sugar and Vanilla: Gradually add the granulated sugar and vanilla extract, mixing until well combined.
- Incorporate Eggs: Add the eggs one at a time, mixing well after each addition. Finally, mix in the sour cream until smooth.
Step 4: Assemble the Bars
- Pour Filling: Pour the cheesecake filling over the cooled crust, spreading it evenly.
- Bake: Bake in the preheated oven for 25-30 minutes, or until the edges are set and the center is slightly jiggly but not wet.
- Cool: Remove from the oven and let it cool at room temperature for about 30 minutes, then refrigerate for at least 2 hours to set.
Step 5: Add the Cherry Topping
- Spread Cherry Filling: Once the cheesecake is set and chilled, spread the cherry pie filling evenly over the top.
- Garnish: If desired, garnish with fresh cherries for an extra touch.
Step 6: Slice and Serve
- Slice: Cut into squares or bars and serve chilled. Enjoy!

Nutritional Information
Here’s a quick glance at the nutritional profile of Cherry Cheesecake Bars (per bar, based on 12 servings):
| Nutrient | Amount per Serving |
|---|---|
| Calories | 250 |
| Protein | 4g |
| Fat | 15g |
| Carbohydrates | 29g |
| Fiber | 1g |
| Sugar | 15g |
Tips for Customization
- Fruit Variations: Substitute the cherry pie filling with other fruit fillings like blueberry, strawberry, or raspberry for a different flavor.
- Chocolate Twist: Add chocolate chips to the cheesecake filling for a delicious chocolate cherry cheesecake bar.
- Nutty Crust: Mix in some chopped nuts with the graham cracker crumbs for added texture and flavor.
Storing Tips for the Recipe
Store any leftover cherry cheesecake bars in an airtight container in the refrigerator for up to 5 days. They can also be frozen for up to 2 months; just wrap them tightly in plastic wrap and aluminum foil before freezing.
Conclusion
Cherry Cheesecake Bars are a delightful and easy-to-make dessert that combines the creamy richness of cheesecake with the sweet-tart flavor of cherries. Perfect for any occasion, these bars are sure to be a hit with family and friends!
FAQs
Can I make these bars ahead of time?
Yes, you can prepare the cheesecake bars a day in advance. Just store them in the refrigerator until you’re ready to serve.
How do I know when the cheesecake is done?
The cheesecake is done when the edges are set, and the center is slightly jiggly but not wet. It will firm up as it cools.
Can I use fresh cherries instead of pie filling?
Yes, you can use fresh cherries! Just pit and halve them, and toss them with a bit of sugar to enhance their sweetness before adding them on top.
Cherry Cheesecake Bars Recipe
Ingredients
- For the Crust:
- • 1 1/2 cups graham cracker crumbs
- • 1/4 cup granulated sugar
- • 1/2 cup unsalted butter, melted
- For the Cheesecake Filling:
- • 16 oz (450 g) cream cheese, softened
- • 1/2 cup granulated sugar
- • 1 teaspoon vanilla extract
- • 2 large eggs
- • 1/4 cup sour cream
- For the Cherry Topping:
- • 1 can (21 oz) cherry pie filling (or fresh cherries, pitted and halved)
- • Optional: Fresh cherries for garnish
Instructions
Step 1: Preheat the Oven
- Preheat your oven to 325°F (160°C).
- Grease a 9x13-inch baking dish or line it with parchment paper for easy removal.
Step 2: Make the Crust
- In a medium bowl, mix the graham cracker crumbs, granulated sugar, and melted butter until well combined.
- Press the mixture firmly into the bottom of the prepared baking dish to form an even layer.
- Bake the crust in the preheated oven for about 10 minutes, or until lightly golden. Remove from the oven and let it cool slightly.
Step 3: Prepare the Cheesecake Filling
- In a large mixing bowl, beat the softened cream cheese with an electric mixer until smooth and creamy.
- Gradually add the granulated sugar and vanilla extract, mixing until well combined.
- Add the eggs one at a time, mixing well after each addition. Finally, mix in the sour cream until smooth.
Step 4: Assemble the Bars
- Pour the cheesecake filling over the cooled crust, spreading it evenly.
- Bake in the preheated oven for 25-30 minutes, or until the edges are set and the center is slightly jiggly but not wet.
- Remove from the oven and let it cool at room temperature for about 30 minutes, then refrigerate for at least 2 hours to set.
Step 5: Add the Cherry Topping
- Once the cheesecake is set and chilled, spread the cherry pie filling evenly over the top.
- If desired, garnish with fresh cherries for an extra touch.
Step 6: Slice and Serve
- Cut into squares or bars and serve chilled.