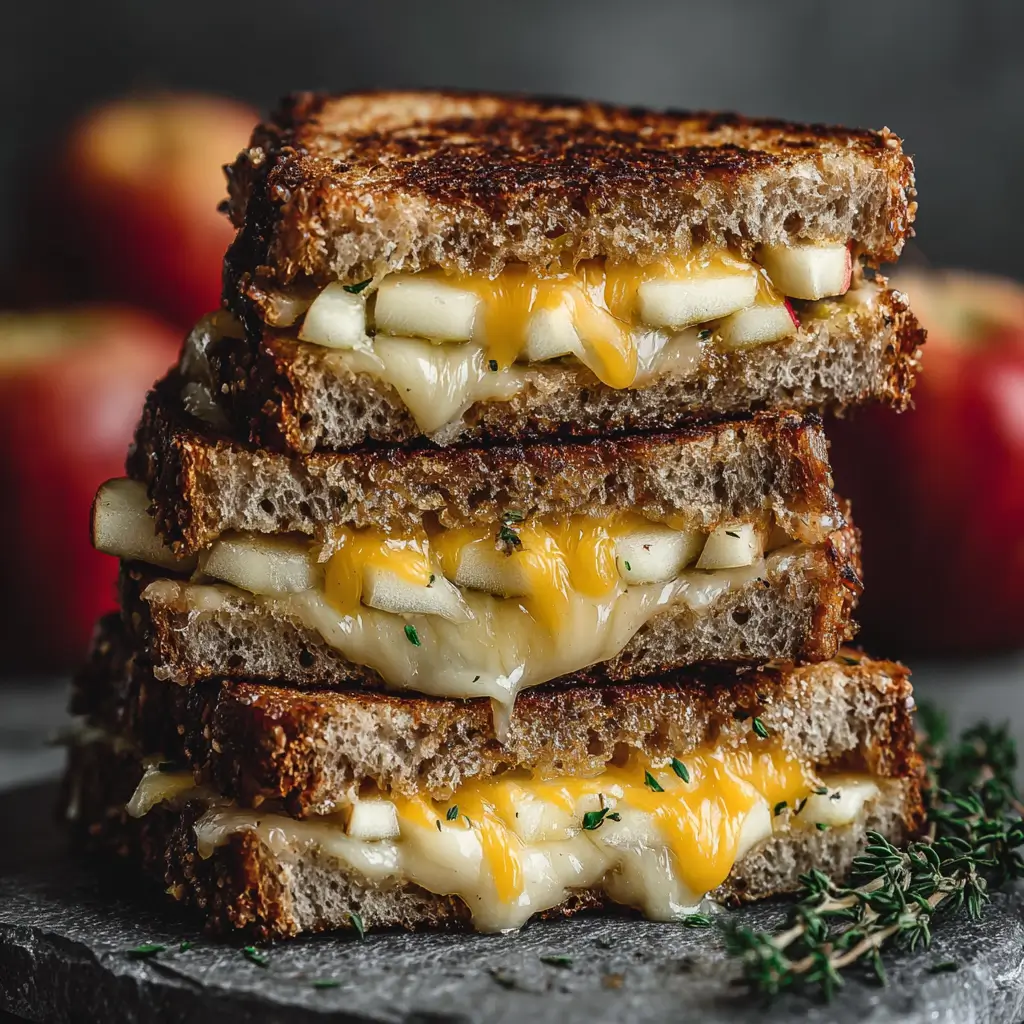
Have you ever considered the delightful combination of savory cheese and sweet fruit in a sandwich? The Cheddar and Apple Grilled Cheese Sandwiches not only challenge traditional notions of grilled cheese but also elevate it to a new level of flavor. This unique pairing creates a harmonious balance between the sharpness of cheddar and the crisp sweetness of apples, making it a perfect comfort food for any occasion. In this post, we will explore everything you need to know about making these mouthwatering sandwiches, from ingredients to serving suggestions.

10-Pack Fridge Organizer Bins
⭐ “Very organized fridge!”
⭐ “Sturdy & clear bins.”

Silicone Stretch Lids (7 Pack)
⭐ “Great reusable lids!”
⭐ “Fits many bowl sizes.”
Ingredients List
To create the perfect Cheddar and Apple Grilled Cheese Sandwiches, gather the following ingredients:
- 4 slices of sourdough or whole-grain bread
- 1 cup sharp cheddar cheese, grated
- 1 medium apple (like Granny Smith or Honeycrisp), thinly sliced
- 2 tablespoons unsalted butter
- 1 teaspoon Dijon mustard (optional)
- Salt and pepper to taste
Substitutions:
- Bread: Substitute with gluten-free bread for a gluten-free option.
- Cheese: Use Gruyère or a mild cheddar if you prefer a different flavor profile.
- Apples: Any firm apple variety will work well, including Fuji or Braeburn.
Step-by-Step Instructions
Step 1: Prepare the Ingredients
Start by gathering all your ingredients. Slice the apple thinly and grate the cheddar cheese. If you’re using Dijon mustard, spread it on one side of each slice of bread for an extra layer of flavor.
Step 2: Assemble the Sandwiches
Lay two slices of bread on a clean surface. On each slice, layer the grated cheddar cheese, followed by the apple slices. Season with a pinch of salt and pepper, then top with the remaining cheese and the other slices of bread.
Step 3: Butter the Bread
Spread one tablespoon of butter on the outside of each sandwich. This will create a golden, crispy crust when grilled.
Step 4: Grill the Sandwiches
Heat a skillet over medium heat. Place the sandwiches in the skillet, cooking until golden brown, about 3-4 minutes per side. Press down gently with a spatula for even grilling.
Step 5: Serve and Enjoy
Once the cheese is melted and the bread is golden, remove the sandwiches from the skillet. Let them cool for a minute before slicing in half. Serve warm and enjoy the delightful blend of flavors!

Nutritional Information
Here’s a breakdown of the nutritional information per serving (based on 2 sandwiches):
| Nutrient | Amount |
|---|---|
| Calories | 450 |
| Total Fat | 25g |
| Saturated Fat | 15g |
| Cholesterol | 60mg |
| Sodium | 650mg |
| Total Carbohydrates | 40g |
| Dietary Fiber | 4g |
| Sugars | 6g |
| Protein | 18g |
Note: Nutritional values may vary based on specific ingredients used.
Healthier Alternatives for the Recipe
If you’re looking to make your Cheddar and Apple Grilled Cheese Sandwiches a bit healthier, consider these modifications:
- Use Low-Fat Cheese: Opt for low-fat cheddar to reduce the calorie count while still enjoying the cheesy goodness.
- Add Greens: Incorporate fresh spinach or arugula for added nutrients and a pop of color.
- Whole Grain Bread: Choose whole grain or sprouted bread for increased fiber content.
Serving Suggestions
These sandwiches are versatile and can be served in various delightful ways:
- Accompanied by a Salad: Pair with a simple green salad or a side of coleslaw for a complete meal.
- With Tomato Soup: Serve alongside a warm bowl of tomato soup for a comforting classic combination.
- Garnished with Herbs: Sprinkle with fresh herbs like thyme or rosemary for an aromatic touch.
Common Mistakes to Avoid
- Overheating the Pan: Cooking on too high heat can burn the bread before the cheese melts. Keep it medium for even cooking.
- Using Too Much Cheese: While it’s tempting to load up on cheese, too much can make the sandwich greasy and difficult to manage.
- Not Slicing the Apples Thinly: Thick slices can prevent the apples from softening properly during cooking, leading to a less enjoyable texture.
Storing Tips for the Recipe
- Leftovers: Store any leftover sandwiches in an airtight container in the refrigerator for up to 2 days.
- Reheating: Reheat in a skillet over low heat to restore the crispiness, or use a toaster oven for best results.
- Freezing: For longer storage, freeze ungrilled assembled sandwiches wrapped tightly in plastic wrap. Grill them directly from the freezer when you’re ready to eat.
Conclusion
The Cheddar and Apple Grilled Cheese Sandwiches offer a delightful twist on the classic comfort food, combining the rich flavors of sharp cheddar with the sweetness of apples. This easy-to-make recipe is perfect for any meal, providing a satisfying and delicious experience. We invite you to try this recipe and share your feedback in the comments below. Don’t forget to subscribe for more delicious updates!
FAQs
1. Can I use other fruits besides apples?
Yes! Pears or even figs can be great alternatives that pair well with cheese.
2. Is this recipe suitable for kids?
Absolutely! The combination of cheese and apples is generally a hit with children. You can adjust the ingredients to suit their tastes.
3. Can I make this sandwich ahead of time?
While it’s best enjoyed fresh, you can prepare the ingredients in advance and assemble the sandwiches just before grilling.

Cheddar and Apple Grilled Cheese Sandwiches
Ingredients
- 4 slices of sourdough or whole-grain bread
- 1 cup sharp cheddar cheese, grated
- 1 medium apple (like Granny Smith or Honeycrisp), thinly sliced
- 2 tablespoons unsalted butter
- 1 teaspoon Dijon mustard (optional)
- Salt and pepper to taste
Instructions
Step 1: Prepare the Ingredients
Start by gathering all your ingredients. Slice the apple thinly and grate the cheddar cheese. If you’re using Dijon mustard, spread it on one side of each slice of bread for an extra layer of flavor.
Step 2: Assemble the Sandwiches
Lay two slices of bread on a clean surface. On each slice, layer the grated cheddar cheese, followed by the apple slices. Season with a pinch of salt and pepper, then top with the remaining cheese and the other slices of bread.
Step 3: Butter the Bread
Spread one tablespoon of butter on the outside of each sandwich. This will create a golden, crispy crust when grilled.
Step 4: Grill the Sandwiches
Heat a skillet over medium heat. Place the sandwiches in the skillet, cooking until golden brown, about 3-4 minutes per side. Press down gently with a spatula for even grilling.
Step 5: Serve and Enjoy
Once the cheese is melted and the bread is golden, remove the sandwiches from the skillet. Let them cool for a minute before slicing in half. Serve warm and enjoy the delightful blend of flavors!