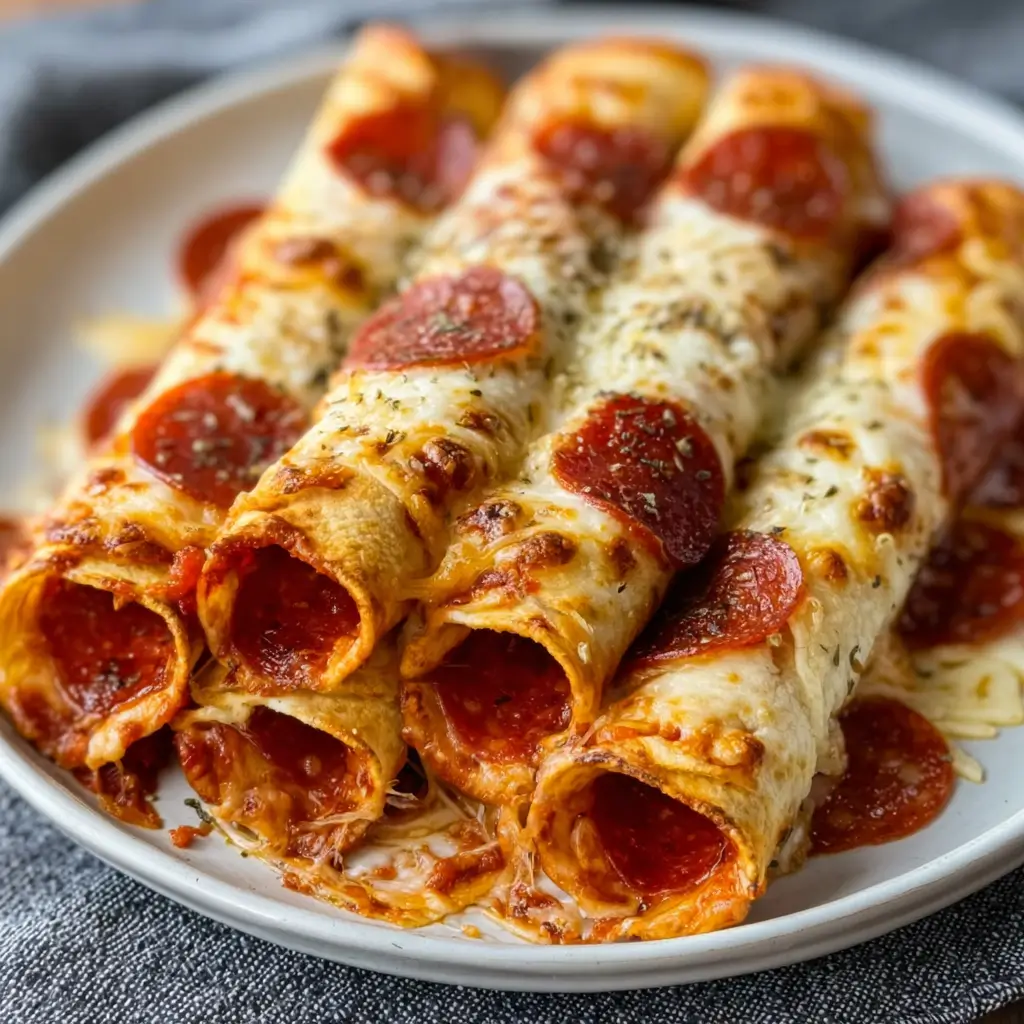
What if you could enjoy all the flavors of pizza—melty cheese, savory pepperoni, and golden crust—in a bite-sized snack that’s ready in under 30 minutes? That’s the magic of Cheesy Pepperoni Roll-Ups. Perfect for parties, family dinners, or quick snacks, these roll-ups combine convenience with irresistible flavor.
With recent food trend data showing that over 67% of Americans enjoy pizza-inspired snacks weekly (Statista, 2024), it’s no surprise that recipes like Cheesy Pepperoni Roll-Ups are gaining popularity. They offer everything you love about pizza but in a compact, handheld form—ideal for game nights, school lunches, or when you’re craving comfort food without the wait.
Ingredients List
Here’s what you’ll need to make Cheesy Pepperoni Roll-Ups at home. Each ingredient adds its own sensory delight, from the gooey cheese to the crispy crust.
- 1 can refrigerated crescent dough (substitute: pizza dough for a chewier texture)
- 24 pepperoni slices (substitute: turkey pepperoni or salami for variety)
- 1 cup shredded mozzarella cheese (swap with cheddar, provolone, or Monterey Jack for a twist)
- ½ cup pizza sauce (or marinara for a smoother, richer flavor)
- 2 tbsp melted butter
- 1 tsp garlic powder
- 1 tsp Italian seasoning
- 2 tbsp grated Parmesan cheese (for a salty, nutty finish)
Tip: Add thinly sliced jalapeños or black olives if you want extra flavor layers.
Step-by-Step Instructions
Step 1: Prepare the Dough
Preheat your oven to 375°F (190°C). Roll out the crescent dough on a lightly floured surface. If using pizza dough, roll into a rectangle about ¼ inch thick for even baking.
Step 2: Layer the Pepperoni & Cheese
Spread a thin layer of pizza sauce over the dough, leaving about ½ inch at the edges. Evenly sprinkle shredded mozzarella across the surface, then layer with pepperoni slices. This ensures every bite is filled with cheesy, pepperoni goodness.
Step 3: Roll It Up
Starting from the long side, carefully roll the dough into a tight log. Seal the edge by pinching the seam together. Slice the log into even pieces, about 1 inch thick, to create neat pinwheel shapes.
Step 4: Brush with Seasoned Butter
Place the roll-ups onto a parchment-lined baking sheet. Brush each piece with melted butter mixed with garlic powder and Italian seasoning, then sprinkle with Parmesan cheese. This step guarantees a golden, flavorful crust.
Step 5: Bake to Perfection
Bake for 12–15 minutes or until the roll-ups are puffed, golden brown, and the cheese is bubbling. Remove from the oven and let them cool slightly before serving with extra pizza sauce for dipping.

Nutritional Information (per roll-up, based on 12 servings)
- Calories: ~120
- Protein: 5g
- Fat: 7g
- Carbohydrates: 9g
- Fiber: 1g
- Sugar: 1g
Compared to a standard pizza slice (which averages 285 calories and 36g of carbs), these Cheesy Pepperoni Roll-Ups cut carbs by nearly 75% per serving.
Healthier Alternatives for the Recipe
- Low-carb option: Use almond flour tortillas or fathead dough to make keto-friendly roll-ups.
- Dairy-free option: Swap mozzarella for dairy-free shredded cheese.
- Protein boost: Add cooked ground chicken or turkey along with the pepperoni.
- Vegetable-packed version: Add finely chopped spinach, mushrooms, or bell peppers before rolling.
Serving Suggestions
- Serve with warm marinara or ranch dip for extra flavor.
- Arrange on a platter as a party appetizer with toothpicks for easy grabbing.
- Pair with a fresh garden salad or roasted veggies for a balanced meal.
- For kids’ lunches, pack them in lunchboxes with a side of carrot sticks and fruit.
Common Mistakes to Avoid
- Overstuffing the rolls – Too much filling will make them burst open during baking.
- Skipping the butter topping – This adds color, flavor, and helps the Parmesan stick.
- Not sealing the edges – Loose seams cause cheese to leak out.
- Baking too long – Overbaking makes the dough tough instead of fluffy.
Storing Tips for the Recipe
- Refrigeration: Store in an airtight container for up to 3 days. Reheat in the oven to restore crispness.
- Freezing: Freeze unbaked roll-ups on a tray, then transfer to freezer bags. Bake straight from frozen, adding 3–4 minutes to cooking time.
- Meal prep hack: Prepare the roll-ups ahead of time and refrigerate raw; bake just before serving for the freshest taste.
Conclusion
Cheesy Pepperoni Roll-Ups are everything you love about pizza wrapped into a golden, bite-sized snack. They’re quick to make, customizable, and a guaranteed crowd-pleaser for any occasion. Try them today, leave your feedback in the comments, and subscribe to our blog for more easy, family-friendly recipes!
FAQs
Q1: Can I use puff pastry instead of crescent dough?
Yes! Puff pastry creates a flakier, buttery texture, making the roll-ups more indulgent.
Q2: How can I make these roll-ups spicier?
Add red pepper flakes, jalapeños, or spicy pepperoni slices to the filling.
Q3: Can I prepare Cheesy Pepperoni Roll-Ups in an air fryer?
Absolutely—cook at 350°F for about 8 minutes until golden brown.

Cheesy Pepperoni Roll-Ups
Ingredients
- 1 package refrigerated pizza dough (or homemade dough)
- 1 cup shredded mozzarella cheese (or provolone/cheddar)
- 1 cup sliced pepperoni (turkey or plant-based options)
- ½ cup marinara sauce (for dipping)
- 1 tsp Italian seasoning (optional)
- 1 egg (for egg wash, optional)
- Flour (for dusting)
Instructions
- Preheat the Oven: Preheat to 400°F (200°C).
- Prepare the Dough: Roll out the pizza dough on a floured surface to ¼ inch thick.
- Add Fillings: Sprinkle mozzarella cheese and layer pepperoni on the dough. Add Italian seasoning if desired.
- Roll It Up: Roll the dough tightly and pinch the edges to seal.
- Slice and Prepare: Cut into 1-inch thick pieces and place cut-side up on a baking sheet. Brush with beaten egg if using.
- Bake: Bake for 15-20 minutes until golden brown and cheese is bubbly.
- Serve: Let cool slightly and serve warm with marinara sauce.
Notes
- Refrigerate leftovers in an airtight container for up to 3 days.
- Reheat in the oven at 350°F (175°C) for about 10 minutes.
- Freeze uncooked roll-ups for longer storage; bake from frozen, adding extra time.