Have you ever wondered how a simple combination of brown sugar and garlic can transform an ordinary chicken dish into a mouthwatering delight? Studies show that meals with a balance of sweet and savory flavors not only tantalize the taste buds but also evoke feelings of comfort and satisfaction. In this post, we will explore the irresistible Brown Sugar Garlic Chicken recipe, which is perfect for weeknight dinners or special occasions. With its caramelized exterior and juicy interior, this dish is sure to become a family favorite.
Ingredients List
To create your delicious Brown Sugar Garlic Chicken, gather the following ingredients:
- Chicken: 4 boneless, skinless chicken breasts (or thighs for a juicier option)
- Brown Sugar: ½ cup packed brown sugar for that rich sweetness
- Garlic: 4 cloves minced garlic, providing a robust flavor
- Soy Sauce: ¼ cup soy sauce (low-sodium recommended for a healthier option)
- Olive Oil: 2 tablespoons extra virgin olive oil for cooking
- Apple Cider Vinegar: 1 tablespoon to add a tangy twist
- Salt and Pepper: To taste
- Green Onions: Chopped, for garnish (optional)
Substitution Suggestions
- Chicken: Substitute with tofu or tempeh for a vegetarian option.
- Soy Sauce: Coconut aminos can be used for a gluten-free alternative.
- Brown Sugar: Honey or maple syrup can be swapped for a different sweetness profile.
Step-by-Step Instructions
Step 1: Prepare the Marinade
In a medium bowl, whisk together the brown sugar, minced garlic, soy sauce, olive oil, and apple cider vinegar. This marinade will infuse the chicken with a delightful blend of sweet and savory flavors.
Step 2: Marinate the Chicken
Place the chicken breasts in a resealable plastic bag or shallow dish. Pour the marinade over the chicken, ensuring it is well coated. Let it marinate for at least 15 minutes (or up to 2 hours in the refrigerator for deeper flavor).
Step 3: Preheat the Skillet
Heat a large skillet over medium-high heat. Add a splash of olive oil to the pan to prevent sticking and enhance flavor.
Step 4: Cook the Chicken
Remove the chicken from the marinade (reserve the marinade) and place it in the hot skillet. Cook for 6-7 minutes on each side until the chicken is golden brown and cooked through (internal temperature should reach 165°F).
Step 5: Add the Marinade
Once the chicken is cooked, pour the reserved marinade into the skillet. Bring it to a simmer and let it cook for an additional 2-3 minutes until slightly thickened. This step enhances the glaze and coats the chicken beautifully.
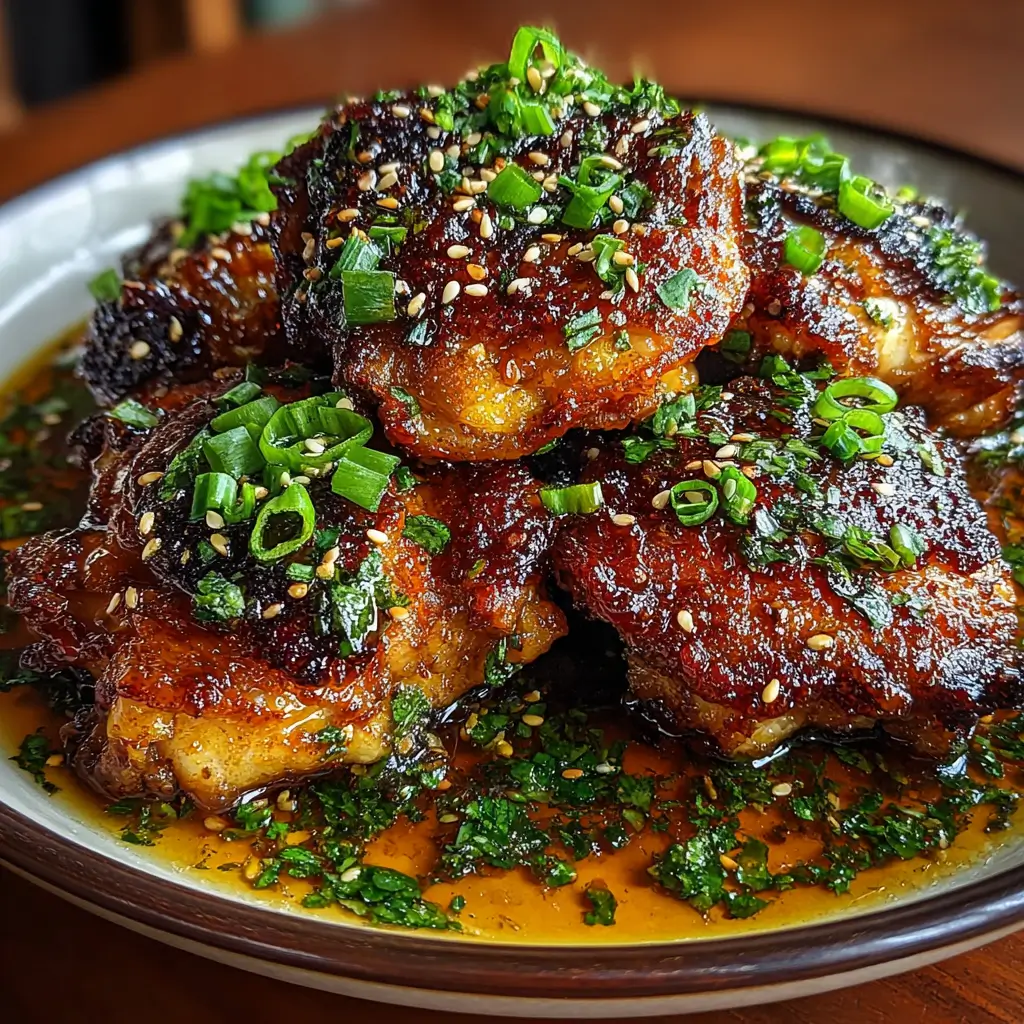
Step 6: Garnish and Serve
Remove the skillet from the heat. Transfer the chicken to a serving plate, drizzle with the thickened sauce, and sprinkle with chopped green onions for a fresh touch. Serve immediately with your favorite sides.

Nutritional Information
Here’s a breakdown of the nutritional information for one serving of Brown Sugar Garlic Chicken (based on one chicken breast):
- Calories: 320
- Total Fat: 10g
- Saturated Fat: 2g
- Cholesterol: 110mg
- Sodium: 600mg
- Total Carbohydrates: 30g
- Dietary Fiber: 0g
- Sugars: 25g
- Protein: 28g
Insights:
This dish balances protein and carbohydrates, making it a satisfying meal option that is also rich in flavor.
Healthier Alternatives for the Recipe
If you’re looking to make your Brown Sugar Garlic Chicken a bit healthier, consider these modifications:
- Lower Sugar: Reduce the amount of brown sugar to ¼ cup or use a sugar substitute like stevia or erythritol.
- Lean Protein: Opt for skinless chicken thighs or turkey breast for a leaner protein source.
- Add Veggies: Incorporate vegetables like broccoli or bell peppers into the skillet during the last few minutes of cooking for added nutrients and color.
Serving Suggestions
To elevate your Brown Sugar Garlic Chicken, consider these serving suggestions:
- Rice or Quinoa: Serve over a bed of fluffy rice or quinoa to soak up the delicious sauce.
- Steamed Vegetables: Pair with steamed broccoli or green beans for a colorful and nutritious meal.
- Salad: A fresh garden salad with a light vinaigrette can complement the richness of the chicken beautifully.
Common Mistakes to Avoid
When preparing your Brown Sugar Garlic Chicken, keep these common pitfalls in mind:
- Overcooking the Chicken: Ensure you monitor the cooking time closely to avoid dry chicken. Use a meat thermometer for accuracy.
- Skipping the Marinade: Allowing the chicken to marinate enhances flavor and juiciness; don’t rush this step.
- Not Thickening the Sauce: Pouring the reserved marinade directly onto the chicken without simmering can result in a watery sauce. Always thicken it for the best flavor.
Storing Tips for the Recipe
To maintain the freshness and flavor of your Brown Sugar Garlic Chicken, consider these storage tips:
- Leftovers: Store any leftover chicken in an airtight container in the refrigerator for up to 3 days.
- Freezing: For longer storage, freeze the cooked chicken in a freezer-safe container for up to 3 months. Thaw in the refrigerator before reheating.
- Reheating: Reheat in a skillet over low heat to maintain moisture or in the microwave in short bursts.
Conclusion
In summary, Brown Sugar Garlic Chicken is a delightful dish that combines sweet and savory flavors to create a satisfying meal. With quick preparation and easy steps, it’s perfect for any occasion. Try this recipe today, and don’t forget to share your feedback in the comments or subscribe for more delicious updates!
FAQs
Q1: Can I use bone-in chicken for this recipe?
A1: Yes, but you will need to adjust the cooking time to ensure the chicken is fully cooked through.
Q2: What can I substitute for brown sugar?
A2: You can use honey, maple syrup, or coconut sugar as alternatives to brown sugar.
Q3: Is this recipe gluten-free?
A3: To make it gluten-free, use tamari or coconut aminos instead of soy sauce.

Brown Sugar Garlic Chicken
Ingredients
- Chicken: 4 boneless, skinless chicken breasts (or thighs for juiciness)
- Brown Sugar: ½ cup packed brown sugar
- Garlic: 4 cloves minced garlic
- Soy Sauce: ¼ cup soy sauce (low-sodium recommended)
- Olive Oil: 2 tablespoons extra virgin olive oil
- Apple Cider Vinegar: 1 tablespoon
- Salt and Pepper: To taste
- Green Onions: Chopped, for garnish (optional)
Instructions
- Prepare the Marinade: Whisk together brown sugar, minced garlic, soy sauce, olive oil, and apple cider vinegar.
- Marinate the Chicken: Coat chicken in the marinade; let it marinate for at least 15 minutes.
- Preheat the Skillet: Heat a large skillet over medium-high heat with olive oil.
- Cook the Chicken: Remove chicken from marinade and cook for 6-7 minutes on each side until golden brown.
- Add the Marinade: Pour reserved marinade into the skillet, simmer for 2-3 minutes until thickened.
- Garnish and Serve: Transfer chicken to a plate, drizzle with sauce, and sprinkle with green onions.