Overview
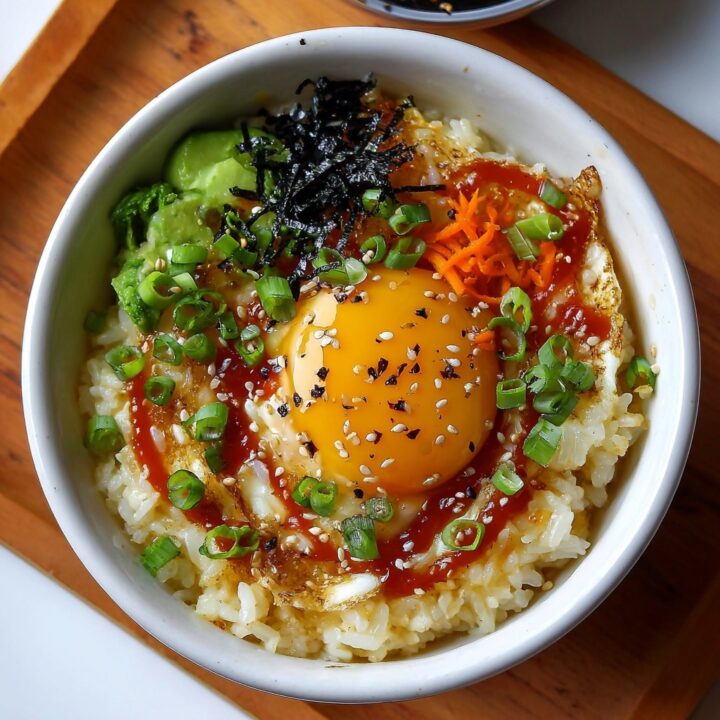
Runny Egg Rice Bowl is a comforting and satisfying dish featuring fluffy rice topped with a perfectly cooked runny egg and a variety of flavorful ingredients. This simple yet delicious bowl is perfect for breakfast, lunch, or dinner!
Ingredients
- 2 cups cooked rice (white, brown, or jasmine)
- 2 large eggs
- 1 tablespoon soy sauce (or tamari for gluten-free)
- 1 teaspoon sesame oil
- 1/2 cup cooked vegetables (such as spinach, peas, or broccoli)
- 1/4 cup green onions, sliced
- Salt and pepper to taste
- Optional toppings: Sriracha, avocado slices, sesame seeds, or nori strips
Timing
Making Runny Egg Rice Bowl takes about 5 minutes for preparation and 10 minutes for cooking.
Instructions
Step 1: Prepare the Rice
- Heat Rice: If using leftover rice, heat it in a microwave or on the stovetop until warm. Fluff with a fork and set aside.
Step 2: Cook the Eggs
- Boil Water: In a small saucepan, bring water to a gentle boil.
- Poach the Eggs: Crack each egg into a small bowl. Carefully slide the eggs into the boiling water and cook for about 3-4 minutes for a runny yolk. Adjust cooking time for firmer yolks if desired.
- Remove Eggs: Using a slotted spoon, gently remove the poached eggs from the water and place them on a paper towel to drain.
Step 3: Assemble the Bowl
- Layer Ingredients: In a serving bowl, add a generous portion of warm rice. Top with the cooked vegetables, soy sauce, and sesame oil.
- Add the Egg: Carefully place the poached egg on top of the rice and vegetables.
- Season: Sprinkle with salt, pepper, and sliced green onions. Add any additional toppings like Sriracha, avocado slices, sesame seeds, or nori strips.
Step 4: Serve
- Enjoy: Serve immediately, breaking the runny yolk over the rice for added flavor and richness. Enjoy your delicious Runny Egg Rice Bowl!

Nutritional Information
Here’s a quick overview of the nutritional content of the Runny Egg Rice Bowl (per serving, based on 2 servings):
| Nutrient | Amount per Serving |
|---|---|
| Calories | 350 |
| Protein | 12g |
| Fat | 10g |
| Carbohydrates | 50g |
| Fiber | 2g |
| Sugar | 1g |
Tips for Customization
- Add Proteins: Include cooked chicken, tofu, or shrimp for added protein.
- Vegetable Options: Use any vegetables you have on hand, such as bell peppers, carrots, or mushrooms.
- Spice It Up: Add chili flakes or hot sauce for a spicy kick.
Conclusion
Runny Egg Rice Bowl is a versatile and comforting dish that combines the richness of a runny egg with nutritious rice and vegetables. Quick to prepare and customizable, this bowl is perfect for any meal of the day!
Runny Egg Rice Bowl Recipe
Prep Time:
5 minutes
Cook Time:
10 minutes
Total Time:
15 minutes
No Ratings
Ingredients
- • 2 cups cooked rice (white, brown, or jasmine)
- • 2 large eggs
- • 1 tablespoon soy sauce (or tamari for gluten-free)
- • 1 teaspoon sesame oil
- • 1/2 cup cooked vegetables (such as spinach, peas, or broccoli)
- • 1/4 cup green onions, sliced
- • Salt and pepper to taste
- • Optional toppings: sriracha, avocado slices, sesame seeds, or nori strips
Instructions
- Heat Rice: If using leftover rice, heat it in a microwave or on the stovetop until warm. Fluff with a fork and set aside.
- Boil Water: In a small saucepan, bring water to a gentle boil.
- Poach the Eggs: Crack each egg into a small bowl. Carefully slide the eggs into the boiling water and cook for about 3-4 minutes for a runny yolk. Adjust cooking time for firmer yolks if desired.
- Remove Eggs: Using a slotted spoon, gently remove the poached eggs from the water and place them on a paper towel to drain.
- Layer Ingredients: In a serving bowl, add a generous portion of warm rice. Top with the cooked vegetables, soy sauce, and sesame oil.
- Add the Egg: Carefully place the poached egg on top of the rice and vegetables.
- Season: Sprinkle with salt, pepper, and sliced green onions. Add any additional toppings like sriracha, avocado slices, sesame seeds, or nori strips.
- Enjoy: Serve immediately, breaking the runny yolk over the rice for added flavor and richness. Enjoy your delicious Runny Egg Rice Bowl!
Step 1: Prepare the Rice
Step 2: Cook the Eggs
Step 3: Assemble the Bowl
Step 4: Serve