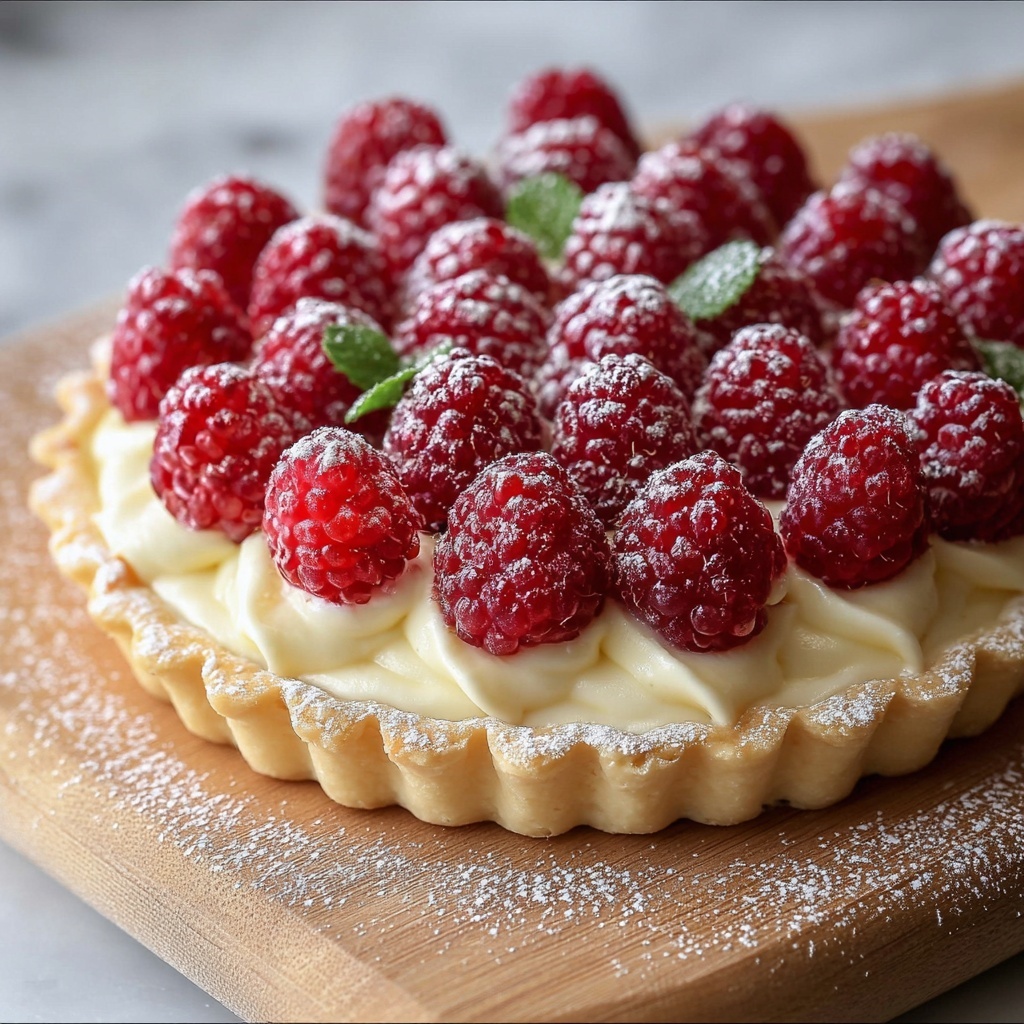
Introduction
Raspberry Ripple Ice Cream is a delightful and refreshing dessert that combines creamy vanilla ice cream with swirls of tart raspberry sauce. This homemade ice cream is perfect for hot summer days or as a sweet treat to impress your guests. In this post, we’ll guide you through making this delicious ice cream step by step.
Ingredients List
For the Ice Cream Base:
- Heavy Cream: 2 cups
- Whole Milk: 1 cup
- Granulated Sugar: ¾ cup
- Vanilla Extract: 1 tablespoon
- Salt: a pinch
- Egg Yolks: 3 (optional, for a custard base)
For the Raspberry Ripple:
- Fresh Raspberries: 2 cups (or frozen, thawed)
- Granulated Sugar: ¼ cup
- Lemon Juice: 1 tablespoon
Timing
Preparing Raspberry Ripple Ice Cream takes approximately 15 minutes of prep time and 4-6 hours of freezing time.
Step-by-Step Instructions
1. Prepare the Raspberry Ripple
- Cook Raspberries: In a small saucepan, combine the raspberries, sugar, and lemon juice. Cook over medium heat, stirring gently, until the raspberries break down and the mixture thickens slightly (about 5-7 minutes).
- Strain: Remove from heat and strain the mixture through a fine mesh sieve to remove the seeds. Allow the raspberry sauce to cool completely.
2. Make the Ice Cream Base
Option 1: Custard Base (Optional)
- Heat Milk and Cream: In a saucepan, combine the heavy cream, whole milk, and half of the sugar. Heat over medium heat until just simmering.
- Whisk Egg Yolks: In a separate bowl, whisk the egg yolks with the remaining sugar until pale and thick.
- Temper the Egg Yolks: Slowly pour a small amount of the hot milk mixture into the egg yolks, whisking constantly to temper them. Then slowly whisk the egg yolk mixture back into the saucepan.
- Thicken: Continue to cook over medium heat, stirring constantly, until the mixture thickens and coats the back of a spoon (about 5-7 minutes). Do not let it boil.
- Cool: Remove from heat, stir in the vanilla extract and a pinch of salt, and let it cool to room temperature. Then refrigerate until chilled.
Option 2: No-Cook Base
- Mix Ingredients: In a large bowl, whisk together the heavy cream, whole milk, sugar, vanilla extract, and salt until the sugar is dissolved. Chill in the refrigerator for about 30 minutes.
3. Churn the Ice Cream
- Churn: Pour the chilled ice cream base into an ice cream maker and churn according to the manufacturer’s instructions until it reaches a soft-serve consistency.
4. Layer with Raspberry Ripple
- Layer: In a freezer-safe container, add a layer of the churned ice cream, followed by a swirl of the raspberry sauce. Repeat the layers until all the ice cream and raspberry sauce are used, swirling gently with a knife to create a ripple effect.
5. Freeze
- Freeze: Cover the container and freeze the ice cream for at least 4-6 hours or until firm.

Serve
- Enjoy: Scoop the Raspberry Ripple Ice Cream into bowls or cones and enjoy this refreshing treat!
Notes
- Storage: Store any leftover ice cream in an airtight container in the freezer for up to 2 weeks.
- Substitutions: You can use other berries such as strawberries or blueberries for a different flavor.
- Common Mistakes: Ensure the ice cream base is completely chilled before churning for the best texture.
Nutritional Information
- Calories: Approximately 250 per serving (based on 1/2 cup servings, makes about 8 servings)
- Fat: 15g
- Protein: 3g
- Carbohydrates: 25g
- Sugar: 20g
| Nutritional Value | Per Serving (8 servings) |
|---|---|
| Calories | 250 |
| Total Fat | 15g |
| Protein | 3g |
| Carbohydrates | 25g |
| Sugar | 20g |
Healthier Alternatives for the Recipe
- Reduced Sugar: Use less sugar in both the ice cream base and raspberry ripple for a lighter option.
- Greek Yogurt: Substitute part of the heavy cream with Greek yogurt for a tangy flavor and lower fat content.
Serving Suggestions
Serve Raspberry Ripple Ice Cream with fresh raspberries on top or alongside a slice of cake for an elegant dessert.
Common Mistakes to Avoid
- Not Chilling the Base: Make sure the ice cream base is well-chilled before churning for the best texture.
- Over-churning: Stop churning once the ice cream reaches a soft-serve consistency to avoid a grainy texture.
Storing Tips for the Recipe
Store the ice cream in an airtight container to prevent ice crystals from forming and maintain its creamy texture.
Conclusion
Raspberry Ripple Ice Cream is a delightful and refreshing dessert that’s perfect for any occasion. With its creamy texture and vibrant raspberry flavor, it’s sure to be a hit with everyone. We invite you to try this recipe, share your experiences in the comments, and subscribe for more delicious updates!
FAQs
1. Can I make this ice cream without an ice cream maker?
Yes, you can make it by pouring the mixture into a shallow dish and stirring every 30 minutes until it reaches the desired consistency.
2. How long does this ice cream last?
It can be stored in the freezer for up to 2 weeks, but it’s best enjoyed fresh.
3. Can I use frozen raspberries?
Yes, you can use frozen raspberries; just thaw them before cooking down for the ripple.
4. What can I serve with this ice cream?
It pairs well with brownies, cakes, or fresh fruit for a delicious dessert.
5. Is this recipe suitable for kids?
Yes, this ice cream is kid-friendly and makes a great

Raspberry Ripple Ice Cream
Ingredients
- For the Ice Cream Base:
- * Heavy Cream: 2 cups
- * Whole Milk: 1 cup
- * Granulated Sugar: ¾ cup
- * Vanilla Extract: 1 tablespoon
- * Salt: a pinch
- * Egg Yolks: 3 (optional, for a custard base)
- For the Raspberry Ripple:
- * Fresh Raspberries: 2 cups (or frozen, thawed)
- * Granulated Sugar: ¼ cup
- * Lemon Juice: 1 tablespoon
Instructions
- Prepare the Raspberry Ripple
- Cook Raspberries: In a small saucepan, combine the raspberries, sugar, and lemon juice. Cook over medium heat, stirring gently, until the raspberries break down and the mixture thickens slightly (about 5-7 minutes).
- Strain: Remove from heat and strain the mixture through a fine mesh sieve to remove the seeds. Allow the raspberry sauce to cool completely.
- Make the Ice Cream Base
Option 1: Custard Base (Optional)
- Heat Milk and Cream: In a saucepan, combine the heavy cream, whole milk, and half of the sugar. Heat over medium heat until just simmering.
- Whisk Egg Yolks: In a separate bowl, whisk the egg yolks with the remaining sugar until pale and thick.
- Temper the Egg Yolks: Slowly pour a small amount of the hot milk mixture into the egg yolks, whisking constantly to temper them. Then slowly whisk the egg yolk mixture back into the saucepan.
- Thicken: Continue to cook over medium heat, stirring constantly, until the mixture thickens and coats the back of a spoon (about 5-7 minutes). Do not let it boil.
- Cool: Remove from heat, stir in the vanilla extract and a pinch of salt, and let it cool to room temperature. Then refrigerate until chilled.
Option 2: No-Cook Base
- Mix Ingredients: In a large bowl, whisk together the heavy cream, whole milk, sugar, vanilla extract, and salt until the sugar is dissolved. Chill in the refrigerator for about 30 minutes.
- Churn the Ice Cream
- Churn: Pour the chilled ice cream base into an ice cream maker and churn according to the manufacturer’s instructions until it reaches a soft-serve consistency.
- Layer with Raspberry Ripple
- Layer: In a freezer-safe container, add a layer of the churned ice cream, followed by a swirl of the raspberry sauce. Repeat the layers until all the ice cream and raspberry sauce are used, swirling gently with a knife to create a ripple effect.
- Freeze
- Freeze: Cover the container and freeze the ice cream for at least 4-6 hours or until firm.
- Serve
- Enjoy: Scoop the Raspberry Ripple Ice Cream into bowls or cones and enjoy this refreshing treat!