Have you ever wondered how to recreate the classic flavors of cannoli in a simpler, more approachable way? Classic Cannoli Squares offer a delightful solution that brings the rich, creamy filling and crispy shell of traditional cannoli to a convenient square format. According to recent culinary trends, desserts that combine classic flavors with modern twists are gaining popularity, making this recipe not only relevant but also a must-try for any dessert lover. In this blog post, we’ll dive into the world of Classic Cannoli Squares, exploring their ingredients, preparation, and tips to make them a standout treat for any occasion.
Ingredients List
Creating Classic Cannoli Squares requires a harmonious blend of flavors and textures. Here’s what you’ll need:
For the Cannoli Filling:
- 15 ounces ricotta cheese (use whole milk for creaminess; low-fat ricotta can be a lighter option)
- 1 cup powdered sugar (or coconut sugar for a healthier alternative)
- 1 teaspoon vanilla extract
- 1/2 teaspoon cinnamon (adds warmth and depth)
- 1/2 cup mini chocolate chips (dark chocolate chips can enhance richness)
For the Cannoli Crust:
- 1 package (14 ounces) of pre-made pie crusts (or homemade for a personal touch)
- 1 egg, beaten (for egg wash)
- 1 tablespoon sugar (for sprinkling)
Optional Garnishes:
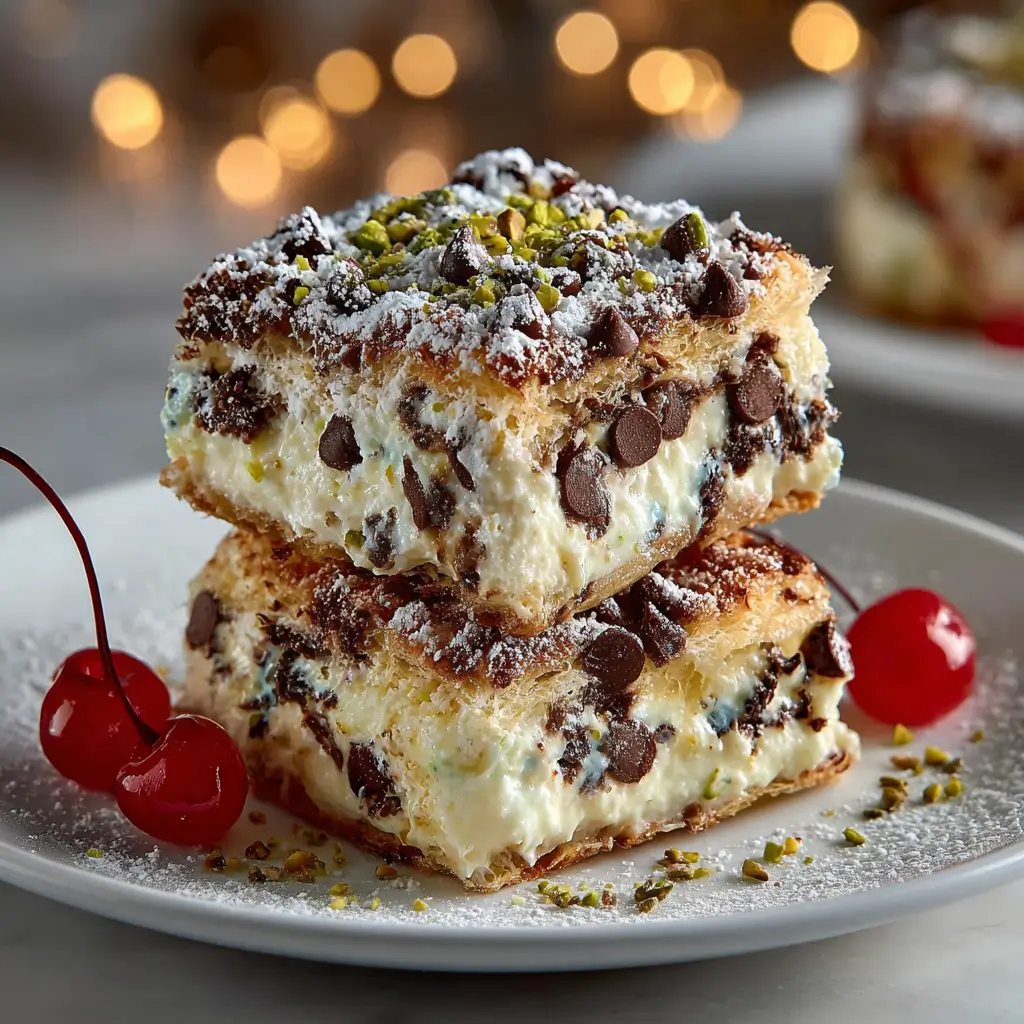
- Chopped pistachios (for a crunchy texture)
- Maraschino cherries (for a pop of color)
- Extra chocolate chips (for decoration)
These ingredients come together to create a dessert that is both visually appealing and deliciously satisfying.
Step-by-Step Instructions
Step 1: Prepare the Filling
In a mixing bowl, combine the ricotta cheese, powdered sugar, vanilla extract, cinnamon, and mini chocolate chips. Mix until smooth and creamy. Tip: Use a fine-mesh sieve to drain excess moisture from the ricotta for a thicker filling.
Step 2: Preheat the Oven
Preheat your oven to 375°F (190°C). This ensures that the crust bakes evenly and achieves a golden-brown color.
Step 3: Roll Out the Pie Crust
If using homemade pie crust, roll it out to fit a 9×9-inch baking dish. If using pre-made crusts, carefully unroll and press them into the bottom of the baking dish, ensuring there are no cracks.
Step 4: Add the Filling
Spread the ricotta filling evenly over the crust, smoothing it out with a spatula. Tip: Leave a small border around the edges to prevent overflow during baking.
Step 5: Prepare the Top Crust
If using a second pie crust, roll it out and place it over the filling. Seal the edges by crimping with a fork. Brush the top with beaten egg and sprinkle with sugar for added sweetness and shine.
Step 6: Bake
Bake in the preheated oven for 30-35 minutes or until the crust is golden brown. Keep an eye on it to prevent over-browning.
Step 7: Cool and Serve
Once baked, remove from the oven and let it cool for at least 30 minutes. Cut into squares and serve with optional garnishes like chopped pistachios or maraschino cherries.
Nutritional Information
Here’s a comprehensive look at the nutritional details per serving (based on 12 servings):
| Nutrient | Amount |
|---|---|
| Calories | 250 |
| Total Fat | 12g |
| Saturated Fat | 5g |
| Cholesterol | 40mg |
| Sodium | 150mg |
| Total Carbohydrates | 30g |
| Dietary Fiber | 1g |
| Sugars | 10g |
| Protein | 5g |
These values provide a balanced dessert option that can fit into a variety of dietary plans.
Healthier Alternatives for the Recipe
If you’re looking to make Classic Cannoli Squares a bit healthier, consider these modifications:
- Ricotta Substitution: Use part-skim or fat-free ricotta for a lighter filling without sacrificing flavor.
- Sugar Alternatives: Replace powdered sugar with a natural sweetener like stevia or monk fruit for a lower-calorie option.
- Whole Wheat Crust: Opt for whole wheat pie crusts for added fiber and nutrients.
These adjustments can help you enjoy the deliciousness of Classic Cannoli Squares while keeping health in mind.
Serving Suggestions
Classic Cannoli Squares are versatile and can be served in a variety of ways:
- Elegant Plating: Serve on a decorative plate with a drizzle of chocolate sauce and a sprinkle of powdered sugar.
- Party Platter: Cut into smaller squares for a dessert platter at gatherings, paired with espresso or cappuccino.
- Individual Servings: Place each square in cupcake liners for a fun, individual dessert option.
These serving ideas make the dessert inviting and adaptable for different occasions.
Common Mistakes to Avoid
When preparing Classic Cannoli Squares, keep these common pitfalls in mind:
- Using Wet Ricotta: Ensure your ricotta is well-drained to avoid a soggy filling. A fine-mesh sieve can help.
- Skipping the Cooling Time: Allowing the squares to cool properly helps the filling set and makes cutting easier.
- Overbaking: Keep an eye on the squares to prevent overbaking, which can lead to a dry crust.
By avoiding these mistakes, you’ll ensure a successful baking experience.
Storing Tips for the Recipe
To keep your Classic Cannoli Squares fresh:
- Refrigeration: Store leftovers in an airtight container in the refrigerator for up to 3 days.
- Freezing: For longer storage, freeze individual squares wrapped in plastic wrap and placed in a freezer bag for up to 2 months. Thaw overnight in the refrigerator before serving.
- Best Practices: To maintain the crust’s texture, avoid freezing the squares with toppings or garnishes.
Following these storage tips will help you enjoy your dessert over several days without losing its delightful flavor.
Conclusion
In summary, Classic Cannoli Squares provide a delightful twist on a beloved Italian dessert, combining rich flavors and creamy textures in a convenient format. With simple ingredients and straightforward steps, you can impress your family and friends with this easy-to-make treat. Try this recipe today, and don’t forget to share your feedback in the comments or subscribe for more delicious updates!
FAQs
Q: Can I make these squares ahead of time?
A: Yes! You can prepare the squares a day in advance and refrigerate them. Just allow them to cool completely before storing.
Q: What can I substitute for ricotta cheese?
A: For a different flavor, you can use mascarpone cheese, or for a lighter option, try cottage cheese blended until smooth.
Q: Can I add other flavors to the filling?
A: Absolutely! Consider adding lemon zest or almond extract for a unique twist on the classic flavor.

Classic Cannoli Squares
Ingredients
- For the Cannoli Filling:
- 15 ounces ricotta cheese (whole milk for creaminess or low-fat for a lighter option)
- 1 cup powdered sugar (or coconut sugar for a healthier alternative)
- 1 teaspoon vanilla extract
- 1/2 teaspoon cinnamon
- 1/2 cup mini chocolate chips (dark chocolate chips enhance richness)
- For the Cannoli Crust:
- 1 package (14 ounces) of pre-made pie crusts (or homemade)
- 1 egg, beaten (for egg wash)
- 1 tablespoon sugar (for sprinkling)
- Optional Garnishes:
- Chopped pistachios
- Maraschino cherries
- Extra chocolate chips
Instructions
- Prepare the Filling: In a mixing bowl, combine ricotta cheese, powdered sugar, vanilla extract, cinnamon, and mini chocolate chips until smooth.
- Preheat the Oven: Preheat your oven to 375°F (190°C).
- Roll Out the Pie Crust: Press the pie crust into a 9x9-inch baking dish.
- Add the Filling: Spread the ricotta filling evenly over the crust.
- Prepare the Top Crust: Roll out a second pie crust and place it over the filling. Seal the edges and brush with beaten egg, then sprinkle with sugar.
- Bake: Bake for 30-35 minutes or until golden brown.
- Cool and Serve: Let cool for at least 30 minutes before cutting into squares.